Showing posts with label Chickens. Show all posts

Saturday, March 31, 2012

Pedicure!


I used dog nail trimmers to trim the sharp points from the rooster's spurs to reduce the danger posed to my children.  He bled a little when I got into the quick, but a few days later seems perfectly fine.  In the picture above you can see the trimmed spur on the right.  The untrimmed spur on the left is on the verge of shedding its outer layer, much like a cat sheds its claws to maintain sharpness.

Saturday, March 24, 2012

In this case, the chicken came before the egg

The hens must be happy in their new digs because three days ago I found this:


Then yesterday three more!


And today they left me four!  


The hens have been much quicker to get back into production after the move than I anticipated and seem they to be ramping up production by the day.  On a down note, the rooster got after my 5 year old a bit today.  I was there and immediately let the rooster know who was boss.  I'd like to keep him, but I can't have him terrorize the kids.  I'm going to trim his spurs to blunt them and give him one more chance.  I'll admit that I'm not hopeful.  It's hard for older animals to break bad habits, especially when they are full of testosterone.

Thursday, March 22, 2012

Chicken and Garden Update


Any time you stress hens by doing something like moving them, they are liable to go into a molt and quit laying eggs.  The hens haven't laid an egg since they've been here, but I expect they will sometime in the next 2 months.  They continue to reliably put themselves up in the hen house at dusk.  All, but one have gotten the idea that roosting in the nest boxes is a bad idea.  I continue to pick up and move her out of the boxes and onto a roosting bar each evening.  She'll get the idea.


The radishes are coming up nicely.  We've had beautiful weather in the mid 70s.


True to form, the cilantro is doing just fine after separating store bought starts.


The onions are poking their bright green heads up.

Wednesday, March 21, 2012

The chickens have left the building


The chickens spent their first week in the coop learning that this is their new home.  This is the warm, dry place with food and water.  I want them to be able to free range on the property, but to return to the hen house each evening for safety's sake and also to lay eggs.  It's no fun going on an Easter egg hunt through the brush every day.  

*Note the steel trashcan.  This is an easy, rodent proof and waterproof feed container.


That week passed and with some trepidation, I opened the door and watched to see what they would do.  They started peering out the door getting more bold with each look.  After about 10 minutes, the rooster hopped out.  Soon they all followed and began happily scratching around looking for something to eat around the pond.  

I went about my business and when I checked on them at dusk, all had returned and were safely in the house.  Seven were on the roosting bars and three had decided to roost in the nest boxes.  I picked up the three nest box birds and put them on the bars.  If they develop the habit of roosting in the nest boxes, they will fill them with poop at night.  That's not a good thing to have eggs covered in.


That's a good looking rooster!

Saturday, March 17, 2012

We have chickens again!


A friend of my sister-in-law gave us an Ameraucana rooster (back left in the picture above) and 9 hens (Ameraucana, Red Star, and Black Star) recently.  They are a mix of ages ranging from 1 to 3 years.  They seem to be very tame and gentle, allowing me to walk up and pick them up without too much problem.  

I love hearing the crows of a rooster again and may let a broody hen raise some chicks this summer.  Despite the rooster's sharp 1 1/2" long spurs, he seems quite docile.  I've "interacted" with a few roosters that were truly mean and would attack humans relentlessly with those sharp spurs.  We have young children whose eyes are within easy striking distance of an aggressive rooster, so even though I'm looking forward to having him around, if he shows any aggression towards humans he will wind up in the soup pot.


The house needed a good clean out from the chickens of the previous owner.  I shoveled everything out and piled it outside to compost*.  I put a layer of fresh pine shavings on the floor and straw in the nest boxes. 


The house has roosting bars already in place.  These are really important, because chickens like to roost up high while they sleep at night.  In the off chance a predator gets into the house at night, the chickens will still have some protection because they are up off the floor.  Chickens also defecate a lot at night and this keeps them up and out of that.


Good ventilation is essential for a hen house.  Their droppings can produce a lot of ammonia, which can cause all sort of health issues for the chickens if it builds up in the house.  The house has two chicken-wire covered windows on one side of the house.

*Never put chicken litter directly into your garden.  It has too much nitrogen and needs the composting period to mellow.  Also, applying fresh manure to food growing areas poses a risk of bacterial contamination of food.

Saturday, July 30, 2011

Chicken Processing Edit


A reader (pixilatedtoo) suggested that leaving the breast meat on the bone until rigor mortis had completed its cycle would result in more tender meat.  I did some reading and found THIS study confirming what she was saying.  I now suggest removing the entire breast on the bone and then chilling it for 24 hours before deboning.  I would use a set of kitchen shears to remove the entire structure.

.

Friday, July 29, 2011

Home Chicken Processing Made Easy

Chicken!  It's what's for dinner.
Raising chickens for meat is not a huge money saving endeavor.  You aren't going to raise it much cheaper than a large-scale poultry producer.  What you gain is freshness, knowledge that the chickens were treated well and fed what you want them to eat, and meat without anything added during packaging.  The chicken pictured above was grown by me, never frozen, and went from the pen to the plate in less than 24 hours.

Here's a quick breakdown of my recent costs:


Item Units Cost per Unit Total
Chicks 15
$2.00
$30.00
Bags of Feed 4
$9.00
  $36.00
Bag of Pine Shavings 1
$5.00
$5.00


Total $71.00

That $71.00 raised 30 boneless-skinless breasts, 30 chicken tenders, 30 wings, 30 thighs, 30 drumsticks, 15 livers, 15 gizzards, and 15 hearts. This doesn't take into account my time (six weeks) or things I reused such as a feeder, waterers, and the space to raise them in.

So you've decided it's worth the effort to raise your own.  You've read my posts HERE and HERE and now after 6 weeks of raising birds you have full grown chickens.  How should you process them out?

The rest of this post contains pictures and descriptions of the humane killing and processing of chickens.  If this offends you, do not read further.


Processing accouterments 

The first step is to gather your supplies and set everything up.  Hang two pieces of twine 18" from each other from something like a horizontal tree branch.  Cut them off and tie a slip knot at the end of each one so that the chicken will hang at chest level.  You will also need a sharp, thin bladed knife, a box cutter with new blade, an ice chest or large bowl with ice, baggies, and a hose with sprayer nozzle.  I prefer to wear gloves while processing, but it's not necessary if you wash your hands well.

Two chickens hung for processing
My prefered method of humanly killing chickens is to hang them up and bleed them out.  It's relatively painfree and the easier on the butcher than cervical dislocation or a chopping block.  It removes the blood from the meat and keeps the bird calm.  A calm bird is the key to a good quality meat.

Neck feathers removed
To bleed a bird out, hang them by their legs and pluck a few feathers from the neck near the head as seen above.  Pull the skin tight between your fingers.  You will see the dark blue jugular vein running along side the trachea.  Sever that with a sharp knife (I prefer the point of a box cutter).  Be careful not to cut into the trachea as that will upset the bird and prevent a good, calm bleed.  Step back and wait for 3-4 minutes.  When no more blood drips from the bird and it is still, it is ready to process.  Be prepared for the bird to flap its wings for a few seconds at the very end.  This is normal and just a nerve reaction.

Skin pulled off of the breast
At this point the bird can either be plucked or skinned.  Plucking takes a lot of time and effort and we don't eat the skin anyway, so we skin the birds.  It's a much quicker process.  If you want to pluck, HERE is how to do it.

To skin the bird, start by making a small incision at the point of the breast bone.  Grab that incision and pull downward to peel the skin off and expose the breast as seen above.

One boneless, skinless breast removed
Using the sharp, thin bladed knife, slice along the sternum.  Then peel the breast off, cutting it loose close to the ribs as you go.  Rinse it off and put it on ice.  Repeat for the other side.

A reader (pixilatedtoo) suggested that leaving the breast meat on the bone until rigor mortis had completed its cycle would result in more tender meat.  I did some reading and found THIS study confirming what she was saying.  I now suggest removing the entire breast on the bone and then chilling it for 24 hours before deboning.  I would use a set of kitchen shears to remove the entire structure.

If you want the wings, remove them by dislocating and cutting through the joints.  Pluck as described in the link above.

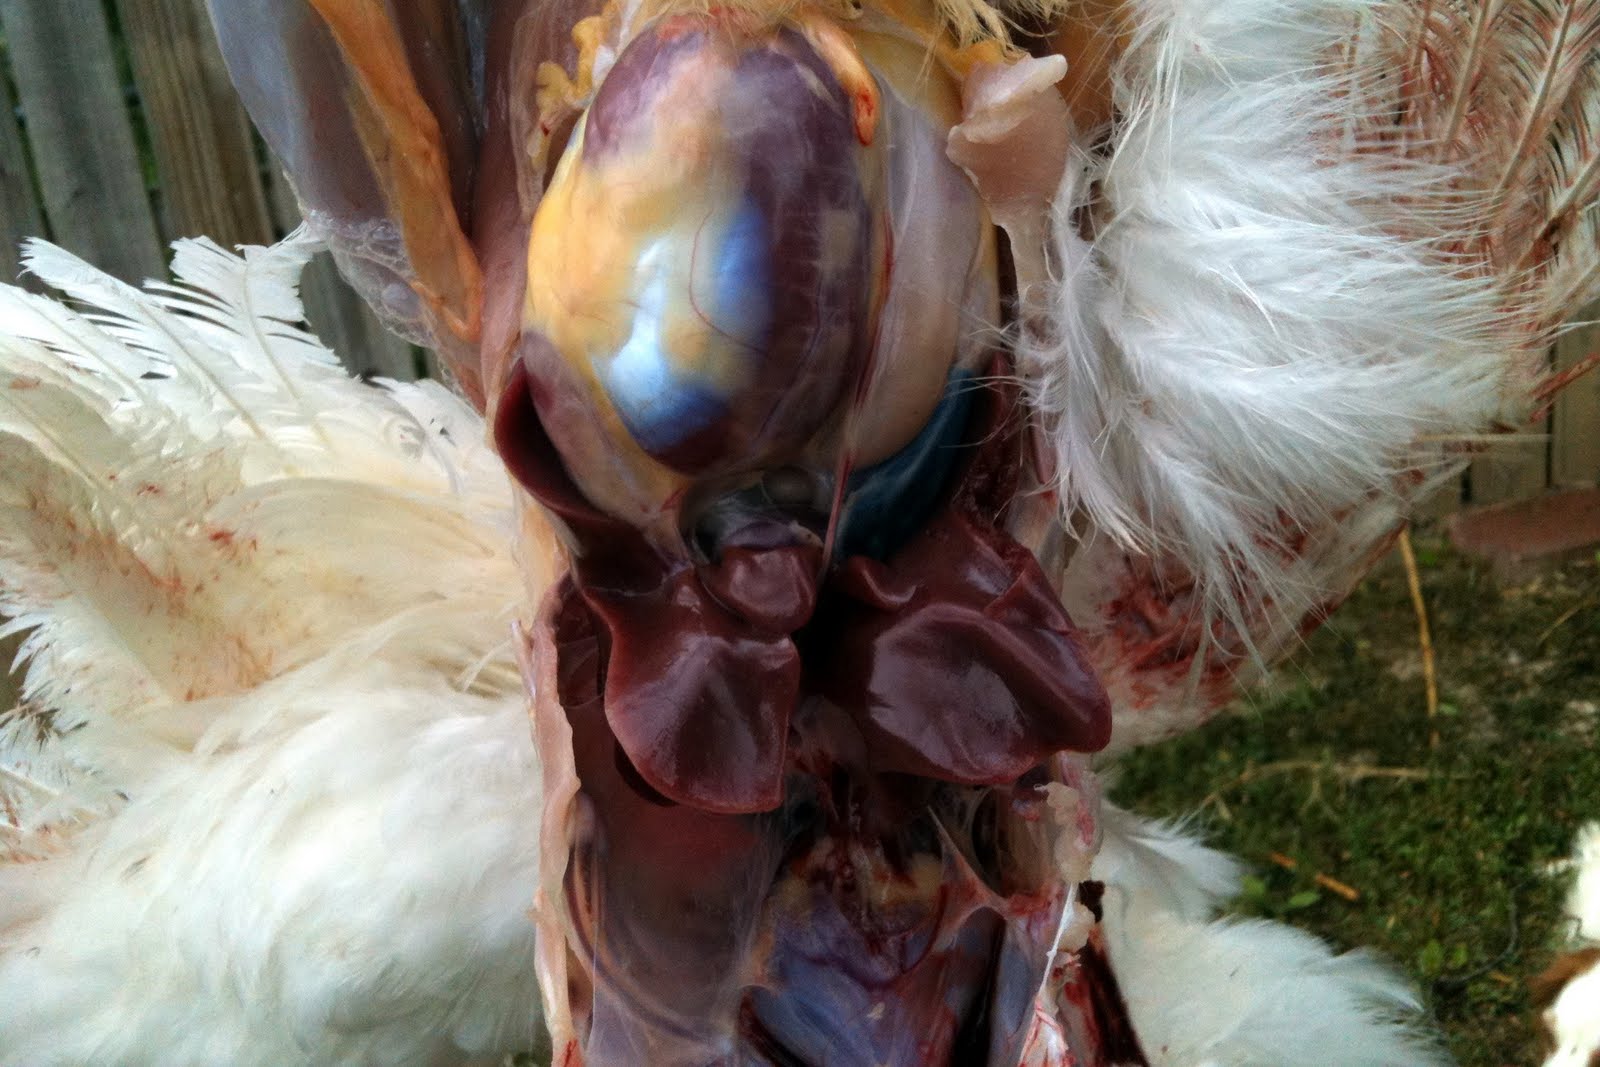
Internal organs exposed
If you want the liver, gizzard, heart, etc., grab the top of the sternum and slowly pull down to expose the internal organs.  Even if you don't want these items, they make great fresh pet food so don't waste them if you have pets.


Busted gallbladder
The liver and heart can be pulled out with your fingers.  When removing the liver, be careful not to rupture the gallbladder as seen above.  If you do, keep the bile off of anything you plan to eat.  Once they are out, bag them up and put them on ice.

Gizzard pulled out
To remove the gizzard, cut the two tubes.  The contents are anything but sterile, so I suggest using a separate knife to do this cutting.  Put it in a baggie on ice for later.

Skin removed from leg quarter
All that's left are the leg quarters.  Run the knife just under the skin on the inside of the leg and cut up to the knee joint.  Pull the skin up and off of the leg as seen above.

Removing leg quarter
Sever the leg through the hip joint.

Removing foot
Remove the foot by cutting through the ankle joint.

One chicken on ice
Rinse and put it on ice.

Gizzard cut open
Because of the nature of a gizzard's contents, wait until you are done with all of the other meat to process these.  Cut along the edge of the gizzard until you are halfway around.

Gizzard contents
Remember the gizzard is full of rocks, so don't cut too deep or you will dull your knife.

Gizzard cleaned out
Rinse out the contents of the gizzard.

Removing the koilin membrane
The gizzard has a thick membrane inside to protect it from the rocks inside.  This is called the koilin membrane.  Peel it off and discard.  Rinse the gizzard well and bag it up

Ready to freeze
Once you've become proficient at it, a chicken can be completely disassembled into its parts in about 5 minutes.

Thursday, July 21, 2011

Weekly Gardening Outlook: Parched

This will be a continuing series where we look ahead at the coming week in gardening for the Northwest Arkansas area.

Small Nanking cherry bush showing signs of drought stress
Large Nanking cherry bush
I planted six Nanking cherry bushes as dormant, bare-root stock last spring.  After a month, four had leafed out and two had not.  I called the nursery and they immediately replaced the two, but by the time I put the two new ones in the ground they were six weeks behind and were going into the ground in the middle of summer.  The pictures above show the importance of planting during the correct time of year.  The smaller plants have a less developed root system and aren't coping with the heat and drought nearly as well as the larger bushes.  I doubt they will make it through the summer.

Roma tomatoes
Ripening Roma tomatoes
Almost there!
Super Sweet 100 cherry tomato plant
The Romas are just about there.  I've never seen this many fruit on the vines.  The Super Sweet 100 cherry tomato vine is producing 3-4 cherry tomatoes a day.  I may need to plant two of them next year.  No evidence of blossom end rot despite the extreme heat and dryness.

Flowering basil
Still plenty of pollinator activity around the basil.  Some seeds are starting to form.

Bell peppers
Jalapeno peppers
Plenty of bounty from the peppers.  A couple of instances of blossom end rot on the bell peppers.

Young eggplant
Five or six little eggplants forming and the plants are both still flowering like crazy.

Okra
The okra are bushing out and soaking up every available drop of sunlight.

Potted blueberry bush
The blueberry harvest is over.  The bushes have more than doubled in size already.

Evergreen bunching onions

I planted these evergreen bunching onions from seed in the spring of 2010.  Since then they've provided a constant availability of green onions, even in the middle of winter.


Butternut squash vines on a cattle panel trellis  
Young butternut squash
The butternut squash vines have crested the top of the cattle panel arbor.  They want to go in every direction and I have to train them up the arbor every few days.  In the middle of the arbor in the picture above, you can see a vine I just retrained.  Its leaves hadn't reoriented to the sun yet, but they did within a few hours.  No sign of squash vine borer yet *crossing fingers*.  I've seen two squash bugs this week and I hand picked them both off.


Same old chard.  Easy.

Turnips
Turnip, ready to harvest
The turnips are all ready to pull.  I've pulled and eaten some, but I don't have a ton of experience eating turnips.  Anyone have a good recipe?

Purple-podded pole bean vines growing up a cattle panel trellis
Purple-podded pole bean flowers
Flower buds are forming on the green bean vines.  Japanese beetles continue to try to eat the foliage, requiring a periodic treatment with NeemII.

Calendula 
I planted a few calendula (pot marigold) where I had open space.  The petals are a colorful addition to salads and are said to have numerous health benefits.

Sand plum
The heat and drought have resulted in smaller sand plums this year.  They aren't quite ripe yet, but in the next few weeks I will turn them into jelly.  Here's a previous post where I show how it's done.

Chicken and Egg Report:

Chickens at 6 weeks old
While I was out of town last weekend, we lost three more of the new laying chicks.  They just disappeared, leaving us with four remaining egg laying chicks.  I put those four in the enclosure with the meat birds and they are still there today.  It's got to be hawks.  I've searched the yard and can find no sign of them.  The dogs don't eat them after they kill them.  After these meat chicks go into the freezer this weekend, I'm going to get another batch of chicks to raise as hens.  With the heat, we are only getting 1-2 eggs per day.

Weather Outlook:

Dry fescue lawn
-Hot.  Mid to upper 90s all week with little chance of rain.
-Water early and often.

What's Being Harvested:

A few peppers and turnips from the garden
-Herbs
-Serrano, jalapeno, and bell peppers
-Green, yellow, and purple onions
-Cherry and Roma tomatoes
-Turnips