Tuesday, June 7, 2011

The "A" Family Gets Chickens

Children's playhouse before conversion to a hen house
Side view
One of the areas in which I'm looking to expand the business is in helping people get started raising small  livestock in their backyards.  Chickens are great because the provide a relatively steady stream of eggs, recycle kitchen waste, and are just enjoyable to watch.  Rabbits are another option.  They are quiet, eat relatively little, provide a very low fat meat source, and their droppings are a great fertilizer for the garden.

As a trial run for advising people in backyard livestock, I previously offered on this blog to help someone set up a backyard flock free of charge.  Mrs. A took me up on it.  Getting them set up was actually a breeze.  They already had 6 chicks from a school project and got 6 more from a friend.  They also had a fabulous playhouse that their children had outgrown.  Below I will detail the retrofitting of the playhouse into a hen house.

Nesting boxes mid-construction
The first thing we did was remove the large plexiglass window under the overhang.  We framed up a simple external nesting box using 2"x4" boards and 1/2" exterior grade plywood.  Each box should be 12"-15" cubes with a box for every 2-4 hens.  The opening was 36" long, so we made 3 nest boxes.

Removable nest dividers added
When the chicks start laying (4-6 months old), the nests will be lined with dry straw.  Every so often the nests will need to be cleaned and have the nesting material replaced with fresh straw.  These removable dividers should make that easy.

Mr. A installs a divider while Mrs. A looks on
Mr. A installs the nest box siding
Nest boxes completed
The door is hinged on the bottom and flips down to provide access to the nests for easy egg collection. The sides are covered with 1/2" exterior grade plywood to provide a draft free nest.

The "A" family at the back of the hen house
Showing off the sliding door and ramp into the chicken house
Sliding door in the closed position
Hen house window
The ramp and sliding door were added to allow the chickens to come and go from the house.  At dusk the chickens put themselves up in the house.  Chickens sleep heavily and are very vulnerable at night.  The sliding door is shut at night to keep out predators.  The two windows were covered with 1/2" screening.  On the coldest nights, they can be shut with sliding pieces of plexiglass.

Inside, the ramp provides access to the nest boxes
The inside openings to the nest boxed will be covered with cloth, with an opening for each box.  I used the pants leg of an old pair of jeans in my hen house.  This provides a dark, private nest environment which hens prefer.  Providing a proper nest box is essential to preventing turning egg collection into an Easter egg hunt around the yard.

What're you lookin at buddy?
My new chicks have arrived and I will post about the how's and what's of preparing for and raising up the chicks in the near future.

Friday, June 3, 2011

Identifying the pest in the garden

Defoliated tomato seedling

I didn't go into enough detail as to why I think the critter eating my tomato plants was a bird or a rat.  A reader emailed me yesterday morning suggesting that a tobacco or tomato hornworm might be the culprit.  He is right that they can defoliate a tomato plant seemingly overnight.  It definitely looks like the work of a tobacco hornworm (or a tomato hornworm) with the leaves gone and the stem remaining, but I had ruled them out for a couple of reasons.  The caterpillars themselves are large and you can usually find them pretty easily. I searched very closely and found nothing, not even the frass (poop) that's usually apparent when they are around. More importantly, it's too early in the season for them as they don't show up until midsummer when the plants are much larger.

Other possibilities I considered were deer, rabbits, and box turtles.  However, those are all physically excluded from my garden by a 6 foot wooden privacy fence, two 50 pound active dogs, and then another 4 foot 1"x2" meshed fence that surrounds the garden (to keep the chickens out).  Squirrels would have just dug the seedlings up and they are rarely seen in my yard because we are surrounded by fields.  It's a pretty far run over open ground for a squirrel to get here from the forest.  I've already discussed the cutworm.  I dismissed it because they don't defoliate, they cut off the stem.  Also, I thoroughly sifted through the soil around the plants where it would be hiding during the day and found nothing.

At this garden site, I've personally watched a hispid cotton rat go down a row of freshly sprouted green beans eating every one*.  One of those could easily have slipped through the fences and past my dogs.  A bird of course can just fly in.  If anyone else has any ideas, I'd love to get your insights.  It was pretty frustrating.

*I need to do a post about the usefulness of a good pellet gun around the garden :)

Thursday, June 2, 2011

Quick Tip: Repairing a hose

Repairing the female end of a soaker hose
I recently ran over one of my 50 foot soaker hoses with the lawn mower.  If you've gardened for long, I'll bet you've chopped up a hose or two as well.  Don't throw them away.  They are very cheap and easy to repair.  This works for any garden hose, not just soaker hoses.  The lawnmower cut mine near the center and since I needed two short soaker hoses anyway, I made two hoses out of the damaged one.

Repaired soaker hose
 On the section with the female end cut off, I cut a little of the damaged end off to squared it up.  I then pushed a replacement brass female fitting into the hose and clamped it in place with a hose clamp as seen above.  Total repair cost = $3.00.  Total time spent = 2 minutes.

Cheap soaker hose fix
On the section where the male (capped) end was cut off, I simply folded the damaged end over and held it in place with a few zip ties.  Total repair cost = maybe $0.10.  Total time spent = 2 minutes.  Another way to repair it would be to cut it off squarely, insert a bolt that's as big around as the inside of the hose, and then clamp it in place with a hose clamp.  You could also always buy a brass male replacement fitting and cap it off.

A few tips:

  • I've found it to be a good practice to spend the money up front and buy quality water hoses.  The cheap ones kink up when they are pulled around (a real pain in the you know where) and are not nearly as durable as high quality hoses.  To me, it's just not worth dealing with a cheap hose.
  • On that note, buy brass replacement fittings.  The cheaper plastic ones are prone to leaking and can be easily broken by overtightening or stepping on them.  It's a dollar or two difference for something that will outlast the hose and can be used over and over again.
  • It might be more cost effective to buy a 100 foot soaker hose and then make several custom length hoses from it than it is to just use several pre-made 25 foot or 50 foot hoses.
  • This is a little early to be talking about it, but drain your hoses and hang them up when winter arrives.  When it gets cold, the material the hoses are made of hardens up.  If water is left in them, it will freeze and expand inside causing cracks to develop.

Wednesday, June 1, 2011

Weekly Gardening Outlook: It's Grow Time!

This will be a continuing series where we look ahead at the coming week in gardening for the Northwest Arkansas area

Onions reaching for the sky

The garden is planted, the days are sunny, and the nights are warm.  Now the weeding, watering, pruning, repelling insects, and fighting diseases begins.

Tomato plants, caged and ready
Whatever was eating my tomato plants got all of them over the course of three nights.  Before we left, I crossed my fingers and replanted.  When we returned home, all of them were intact and thriving.  Yea!  I believe it was the work of an animal and that the new cages overhead and the new rotted straw mulch deterred it.  This year I am trying rotted straw as a garden mulch.  It seems to be doing a great job at reducing moisture fluctuation in the soil and suppressing weeds.  Thumbs up so far.

Cutworm
I did find this cutworm in the front yard.  So they are in the area, but I don't think a cutworm was the tomato killing culprit.  The stalks were intact, but defoliated.  A cutworm would have cut them off at the base like Paul Bunyan.

Pepper plants
I planted 4 bell pepper plants, a serrano pepper plant, a jalapeño pepper plant, and a mild jalapeño pepper plant before we left.  They doubled in size while we were gone.  I added 2-3 foot high stakes after this picture was taken.  I will tie the plants loosely to the stakes with strips of pantyhose as they grow to provide support.

Sweet Basil
My three basil plants were purchased in one pot and subdivided.  They are thriving and won't require much care other than watering.

Strawberry plants sending out runners
Things that do require some care are the strawberry plants.  They constantly send out runners, which should be pruned off.  The first wave of berries has tapered off.  Another should be along shortly.

Onion sets flowering
Onions bulbing up a little
Some of the onions sets that I planted are flowering.  Onions being biennial, this shouldn't happen until the
second season.  I'm not sure why they are doing this.  Perhaps our late freeze convinced them that they had been through a winter and that they are now on their second year.  I removed the scapes and we will see if it has any effect on the bulbs.

Bolting hybrid cilantro
The hybrid cilantro that I bought from the store has begun to bolt (flower), though it resisted the heat much better than the heirloom volunteer cilantro.  The lower leaves still taste fine, so I have cut the tops off and we'll see if I get any usable cilantro from the remaining plant to use in salsa.

Bolting arugula
The arugula bolted and tasted very bitter.  It's now in the compost bin.

Lemon thyme with a side of cilantro
Thyme
Oregano
The herbs are spreading out.  I purposely did not surround them with rotted straw so that they could do this.  Also, thyme and oregano prefer a drier soil.

Green Beans planted (purple podded pole)
A row of green beans (purple podded pole beans) was planted where the spaghetti squash was last year.  The straw was simply pulled back to expose a row.  They will grow up the trellis made from cattle panel.

Butternut squash seedlings after thinning
The butternut squash seeds, planted before we left, have emerged.  I planted 2-3 seeds per hole and pinched off all, but the strongest seedling.  We had such a problem with the squash vine borer (SVB) last year, that the only squash species that we planted this year is the butternut, which is said to be resistant to the SVB.

Green blueberries
We will get 3-4 good clusters off of this bush this year.  The other remaining bush isn't producing, but seems to be growing well.

Sunchokes (aka Jerusalem artichokes)

The sunchokes are emerging.  I chose not to harvest any this past fall to give them an extra year to become established.  They took advantage of that and have multiplied quite a lot.  What you see above is from the planting of just one tuber last spring.


Native blackberry vines flowering
Unknown grape vine
Some wild edibles have sprung up at the back of the property.  We've gotten wild blackberries there for years.  There's a power line overhead and the birds "plant" the seeds for us.  The grapevine is new.  I haven't identified what kind it is, but I will keep an eye on it.  The neighbors have a large grapevine, so I assume that is the source.


Homemade, collapsible squarefoot planting guide
I have never been a fan of permanent dividers or string marking the divisions in a squarefoot garden.  They tend to get in the way of weeding, mulch application, and soaker hose placement.  So I developed this planting tool that is very portable and makes planting a square foot garden a snap.  It is simply 2"x4" boards ripped down the middle and joined together loosely with bolts.  It allows you to plant 16 square feet at a time and is removed once the seeds or plants are in place.


Chicken and Egg Report:

Chickens foraging
We are getting three to four eggs a day from our backyard flock of 6 hens. I am expecting a shipment of 10 assorted brown egg layers and 15 white cornish/rock cross meat birds sometime this week.  The 15 meat birds will be raised for only 6-7 weeks.  If they get much older than that, the meat begins to toughen up.  Come late July, we will have a freezer full of fresh, homegrown chicken!  The new laying hens will begin laying sometime in November and will replace our current hens.  The current hens will be canned up at that time for use in chicken salad sandwiches and soups.  The pressure canning process makes these tough old birds quite good to eat.

Weather Outlook:

-Hot and dry.  Slight chance of a popup shower here and there.
-Keep your garden well watered.  The high winds and temperatures will dry the garden out.

What's Being Harvested:


Freshly harvested cilantro

-Strawberries (barely)
-Cilantro
-Herbs

Tuesday, May 31, 2011

I'm back!


I've been away for the last week and a half on vacation.  Now I'm back and the garden is rocking along.  Look for posting to pick up in the coming days.

Weekly Gardening Outlook: Planting Time! *Republished from 5/11/2011*

This will be a continuing series where we look ahead at the coming week in gardening for the Northwest Arkansas area.


The Blogger problems seem to have been resolved and I have been able to reconstruct this earlier post.  I am republishing it, though the material is a couple of weeks old.

My youngest boy helping out in the garden
A mistake many people make is putting their warm season annuals (tomatoes, peppers, eggplant, squash, etc.) out too early in the season. I have done it myself. The gardening bug hits with that first warm day in the spring and you just want to fill the garden up. For a gardener in the extreme northern United States or Canada, where growing seasons are short it makes sense to get the summer crops in the ground as soon as possible and try to protect them from cooler weather. However, here in northwest Arkansas, we have a fairly long growing season of about 5 and a half months. There is plenty of time for the crops to mature before the first freezes hit in October. These warm season annuals can be permanently stunted by cool soil and overnight temperatures, so I don't plant too much until the first part of May.


Bed overtaken with Bermuda grass
Well here we are in early May and it's time to really get our hands in the earth. In the picture above, you can see the bane of my gardening existence. Bermuda grass. This is by far the worst infestation of any of my beds. When building your own beds, I urge you REMOVE ALL BERMUDA GRASS within several feet of your beds and don't let it ever get a toehold in your garden. I wet the soil and remove as much as I can find by hand every spring. This plus constantly weeding out new shoots gets me through the summer. I refuse to use RoundUp.
Silver maple shading the garden
Light pruning of a silver maple
Silver maple roots invading raised beds
Trees and gardens are a bad combination. The silver maple pictured above shades the back part of my garden and its roots seek out the fertile soil in my raised beds. Each spring I trim back overhanging branches to increase sunlight to the garden area. I can't stress how important adequate sunlight is. Without it your summer annuals will be smaller, produce less, and will be more disease prone.

Garden soil and a worm
Speaking of garden soil, this is what the soil looks like after just three years of organic gardening. Loose, crumbly, black, and full of worms. The formula is plenty of organic matter (compost) + no chemicals + avoiding soil compaction by not walking on it or using power tillers. Simple.

On to the planting.

Multiple basil plants in one pot
Removing a "biodegradable" pot
Basil is a member of the mint family and as such is extremely hardy. I carefully separate the roots of each individual plant in a basil pot and plant them separately. I got three different plants from this one purchase and they are all doing very well.

On "biodegradable" peat pots. I don't like them. I have planted them into the ground per instructions before and at the end of the season, the pots were still there when I pulled the plant up. It's my contention that they restrict the roots of a plant. It may do okay in the pot, but it will do better without it. Also, a peat pot with the rim above the soil line acts as a wick that sucks the moisture out of the soil up the where it can evaporate. I soak the plants thoroughly and let them sit awhile and then remove the pot as shown above. I use the remains of the peat pot as a weed barrier on the soil surface.

Two tomato seedlings; the one on the right is pruned and ready for planting
Planted tomato seedling
Tomato seedlings and a soaker hose
Tomatoes are easy to plant. Dig a hole that's almost as deep as the plant is tall. Pinch off all, but the top leaves. Throw and handful of crushed eggshells in the hole to provide calcium to prevent blossom end rot. Plant the seedling deep with just the uppermost leaves protruding from the ground. Tomato plants will root all along the stem and this gives them a nice big root system. They will need support to keep them up off the ground. See HERE for a previous post about caging, trellising, and staking.

Peppers and a soaker hose
Pepper seedling
Peppers are even easier. Plant them with the garden soil at the same level as the plant was in the pot. Insert a strong 3 foot long stake in the ground near the base of the plant (not shown above). Do it while the plant is small so that you don't damage the plant roots later on.

Tomatoes, peppers, onions, and basil inside the bed; Strawberry plants in the blocks
Two beds planted. Two to go.

Damaged tomato seedling
The next day I found 5 of my tomato seedlings that looked like this. My first thought was cutworms, but they cuts are not low enough or smooth enough and sifting the soil around the seedling did not reveal the worm. Deer and rabbits are excluded by multiple fences and vigilant dogs. I think this was caused by a rat or birds. Something to keep an eye on. Replanting will be needed.
Thyme
Oregano
Cilantro and onions
The cilantro is ready to harvest. If not harvested, it will soon bolt due to the upper 80 degree temperatures we've been experiencing.

Arugula
The arugula bounced right back from the previous harvest and is ready to be picked again.

Strawberries
Freshly picked strawberries
Morning snack for the kids
The strawberries are starting to produce a nice daily harvest. So much more flavorful than the watery store-bought version.

Pillbug damage
Here is an example of pillbug damage that I talked about earlier in THIS post. This was the only affected berry I could find. I just cut off the affected part and ate the rest.

Garlic chives
These were given to me by my Master Gardener mentor. I will let them grow a little more before I eat some. They are very invasive, so they have been planted in the blocks to keep them from taking over the garden.

Mint
Speaking of invasive. My mint plants were started by cutting a few pieces from my in law's plants and then just sticking them in the dirt. From there they have come back year after year. These MUST be planting in some sort of containment.

Green sand plums.
Immature blueberry clusters
The plums are on their way, as are the blueberries.

Nanking cherry bush
The Nanking bush cherries flowered a little, but I cannot detect any growing fruit.

Onion seeds
The onion's seeds are in various stages of maturity. I plan to save some for next year. Honey bees and hover flies continue to be strongly attracted to these flowers.


Hula hoe


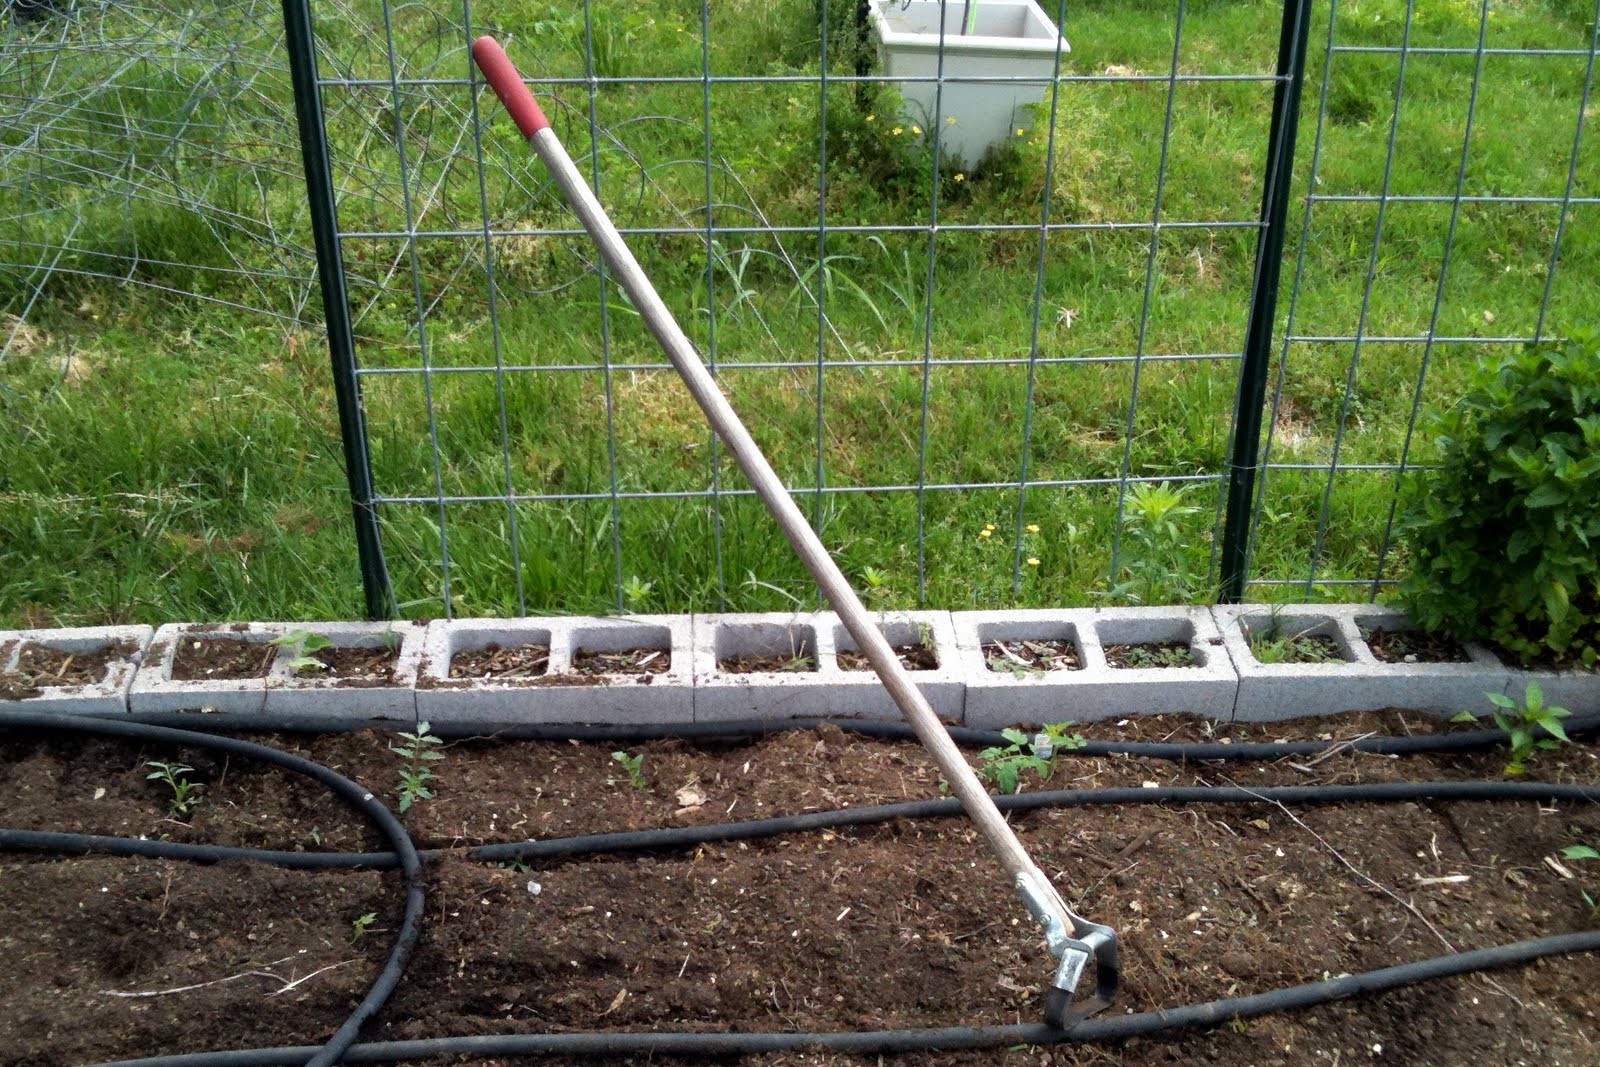
The hula hoe (aka stirrup hoe or scuffle hoe) is a must have tool for any garden, whether raised bed or row crop. It allows a gardener to quickly remove weeds with precision, without having to bend down. To use it, drag the blade across the ground just under the surface. It cuts off weeds, but doesn't destroy the root structure of nearby crops. When preparing beds or weeding large areas where less precision is needed, it can be worked back and forth like a mop. In the spring, I take my hula hoe out of the garden shed and it doesn't get put back until winter. I like to always have it handy for a quick weeding session. If I could only have one tool in the garden, this would be it.


Chicken and Egg Report:

Watermelon rind picked clean by chickens
We are getting five eggs a day from our backyard flock of 6 hens. An often overlooked benefit to chickens is the ability to recycle kitchen scraps without composting. They will eat anything short of citrus peels or onion tops.

Weather Outlook:

-Hot with chances of strong storms for Wednesday and Thursday. Cooling back down into the 60s on Friday. Dry the rest of the week. Slowly warming to the upper 70s again by next week.

What's Being Harvested:

-Strawberries
-Garlic scapes
-Herbs
-Arugula